
Retain The Earth / Installation & care
A practical guide to concrete sleeper walls.
Understand the build sequence, the drainage behind the wall and the care that keeps the finish looking its best.
Before you start
Check the site and the drawings first.
Confirm the wall line, levels, soil, services, nearby structures, fences and any loads behind the wall. Check local approval requirements and the specified sleepers, galvanised posts, pier sizes, drainage and backfill.
Engineering for the site takes priority over any example on this page.
Installation sequence
From setting out to backfill.
Set out
Mark the alignment with pegs and a string line. Set post centres to suit the actual sleeper length and installation tolerance specified for your system.
Excavate & set posts
Dig the designed pier diameter and depth. Position, brace and plumb the specified galvanised posts, then concrete them in. Allow the required curing time before loading.
Place sleepers
Use suitable lifting equipment. Level the first course and check that every sleeper seats securely and that the finished faces remain aligned as courses are added.
Drain behind the wall
Place the specified protective membrane or fabric directly against the back of the sleepers. Install a slotted drain at the base with a suitable outlet, then fill the designed drainage zone with clean 25 mm stone. The design sets the gravel height and width.
Backfill & inspect
Backfill and compact to the project method. Keep equipment and extra loads away from the wall unless the design allows them. Check the final alignment and drainage outlet.
A common question
How deep do posts go?
The engineer’s pier and embedment details govern the job. For early estimating on a wall without a specified depth, our usual allowance is an embedment below the lower finished ground level equal to the exposed wall height plus 200 mm.
This is an estimating allowance, not a universal minimum or a substitute for a footing design. The hole depth, post section, concrete cover and diameter may differ with soil, slope and loads.
Drainage, in side view
Give water a route out.
The section below identifies the components and their positions. The amount of gravel and all outlet details must follow the project design.
Watch / 18 seconds
Why drainage matters
Water trapped behind a retaining wall adds pressure. This short site video explains why the drain and its outlet should be planned before backfilling.
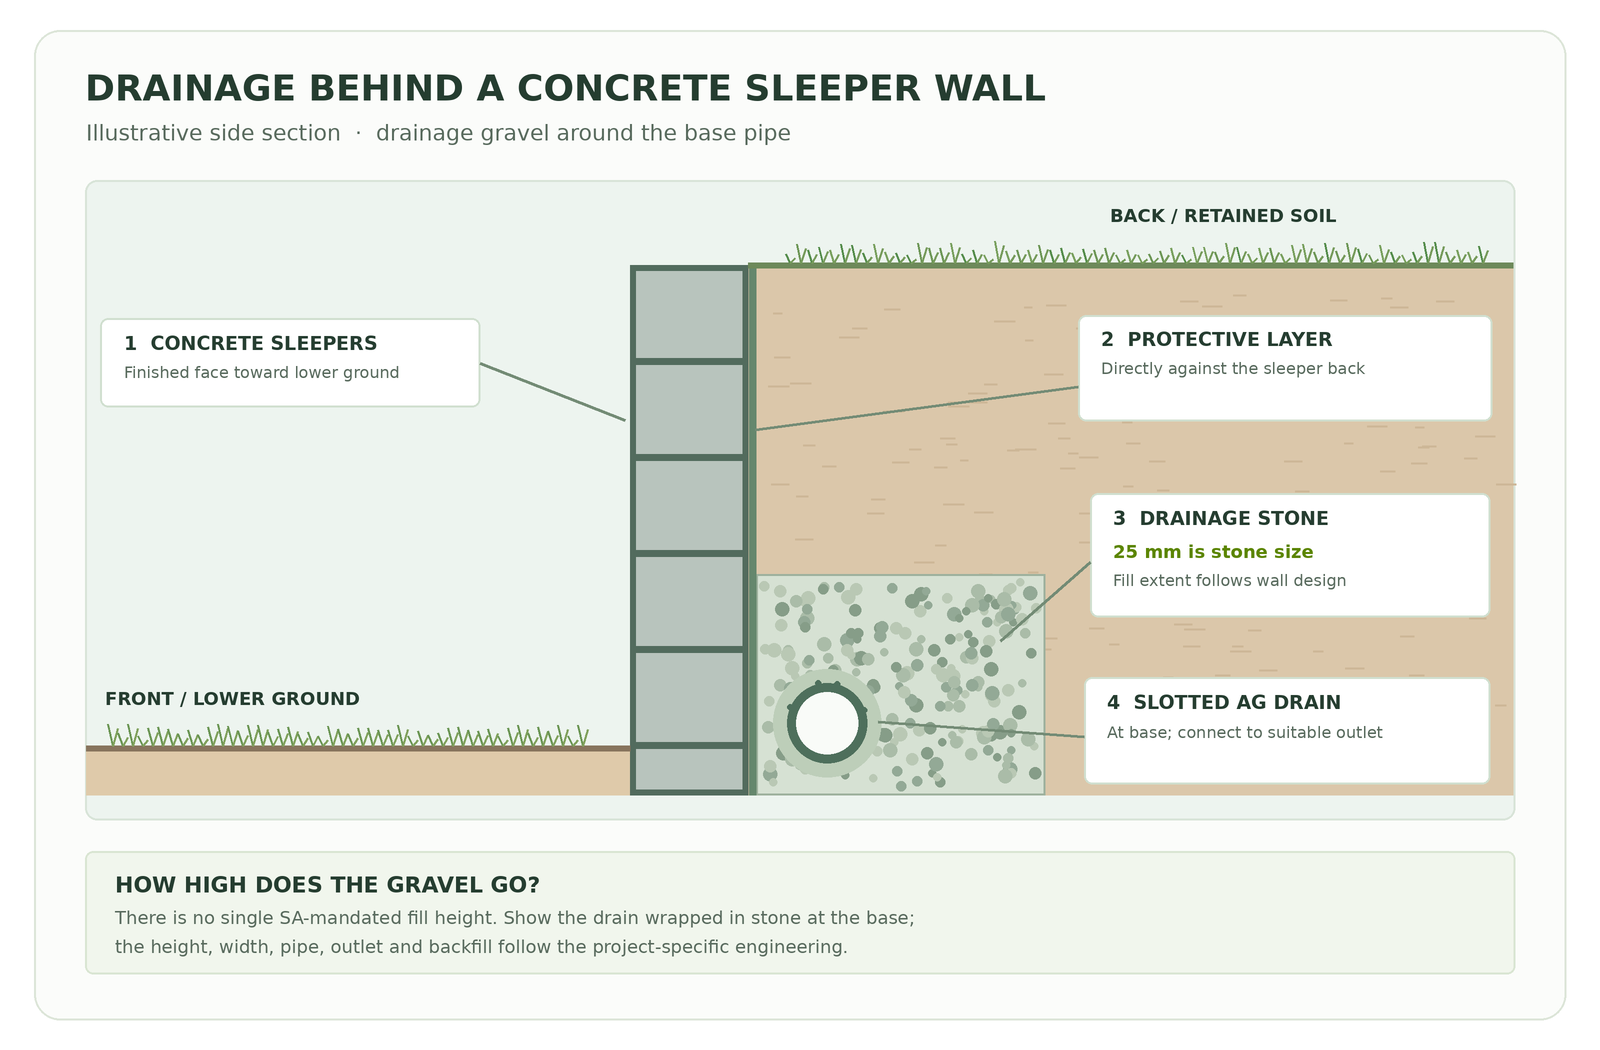
Illustrative side section, not to scale. The gravel height and width, layer type, pipe and outlet are set by the project design. Landscaping shown is indicative; assess planting and loads near the wall.
After installation
Care for the wall and its finish.
Lime bloom (efflorescence)
New concrete can develop pale or white patches as soluble compounds migrate to the surface and leave a calcium carbonate deposit. It is a visual effect and does not by itself reduce the sleeper’s structural strength. It often fades with normal weathering, though timing varies by site.
Good drainage and avoiding persistent moisture help reduce its likelihood. If marks concern you, contact us for product-specific cleaning advice before applying any treatment.
Simple maintenance checks
- Keep the drain outlet clear and look for water pooling behind or in front of the wall.
- Check for movement, leaning, cracks or bulging; obtain an installer or engineer’s advice if these appear.
- Use a gentle hose rinse for ordinary dirt. Avoid aggressive scrubbing, pressure cleaning or unapproved chemicals on the concrete face.
- Manage irrigation and invasive roots near the wall.
Planning your project
Products and technical information.
This guide is general information for Retain The Earth products. It does not replace project-specific engineering, council requirements or a qualified installer’s method. Check South Australian approval requirements.
Ready to plan your order?
Send us the sleeper size, finish, quantity and delivery suburb for a supply quote.